How to Identify Storm Damage on Asphalt Shingles
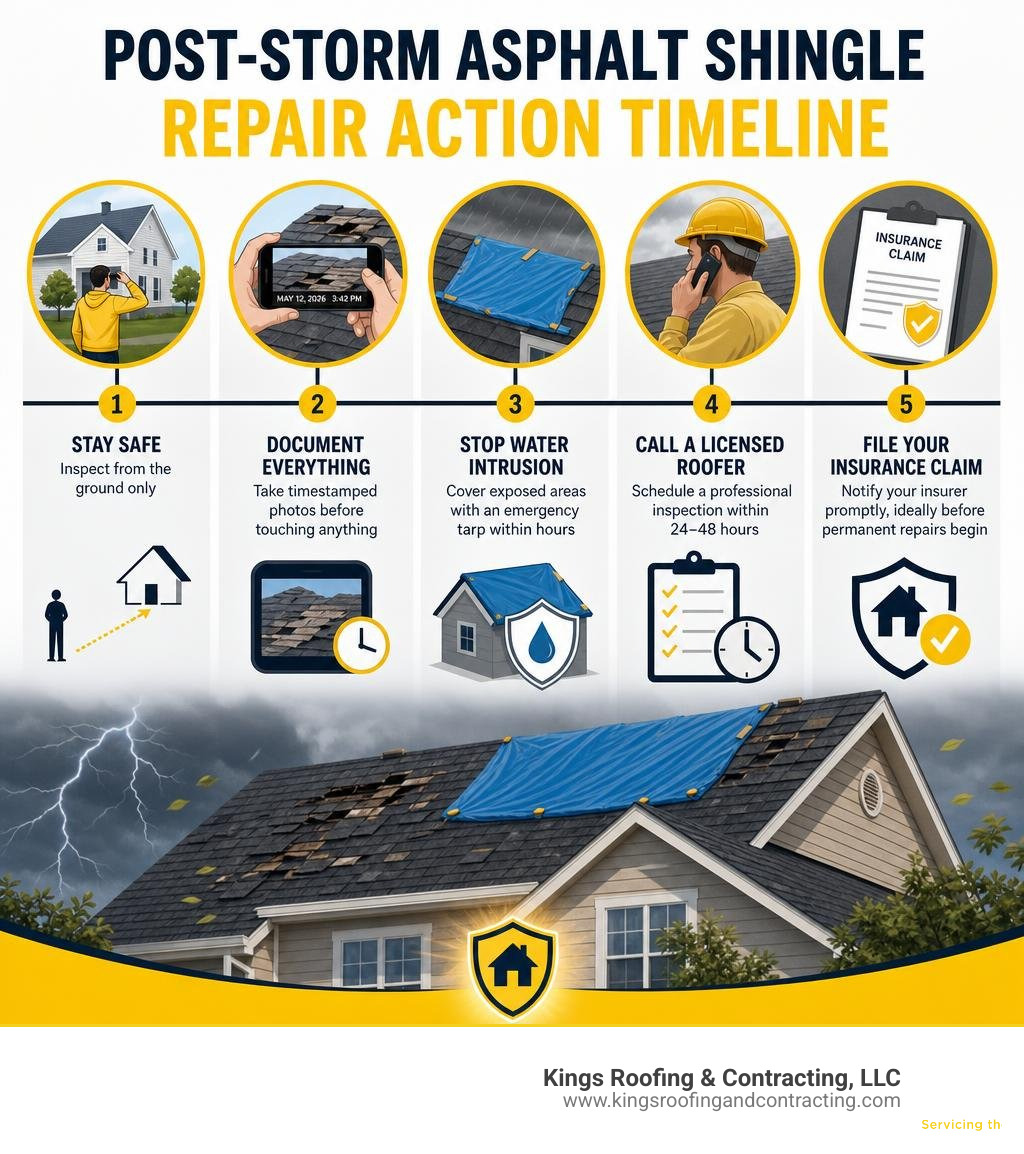
Asphalt shingle storm repair is the process of restoring damaged shingles after wind, hail, or heavy rain has compromised your roof’s ability to protect your home. If your roof has been compromised, partnering with a trusted professional roofing contractor is the first step to securing your property. Here’s what to do right away:
- Stay safe — inspect from the ground only
- Document everything — take timestamped photos before touching anything
- Stop water intrusion — cover exposed areas with an emergency tarp within hours
- Call a licensed roofer — schedule a professional inspection within 24–48 hours
- File your insurance claim — notify your insurer promptly, ideally before permanent repairs begin
Storms in the Treasure Valley can go from minor to destructive fast. A few missing shingles after a wind event might look like a small problem — but left unaddressed, that $150–$500 repair can escalate to $8,000–$20,000 or more within two years as water works its way into the deck, insulation, and framing beneath. Mold colonizes wet wood in as little as 24–48 hours. The damage compounds quietly, and by the time it’s visible on your ceiling, the repair bill has already multiplied.
That’s the reality homeowners across Boise, Meridian, and the broader Treasure Valley face after every hail event or windstorm. If you’ve landed here because your roof just took a hit, you’re in the right place. This guide walks you through every step — from spotting damage to filing your insurance claim — so you can protect your home and make smart decisions without getting overwhelmed.
I’m Ryan Santoro, owner of Kings Roofing & Contracting, LLC, and with 24 years of construction experience — including hands-on asphalt shingle storm repair across Boise and the Treasure Valley — I’ve seen how quickly minor storm damage turns into major structural problems. That field experience is the foundation of every recommendation in this guide.
Asphalt shingle storm repair terms to remember:
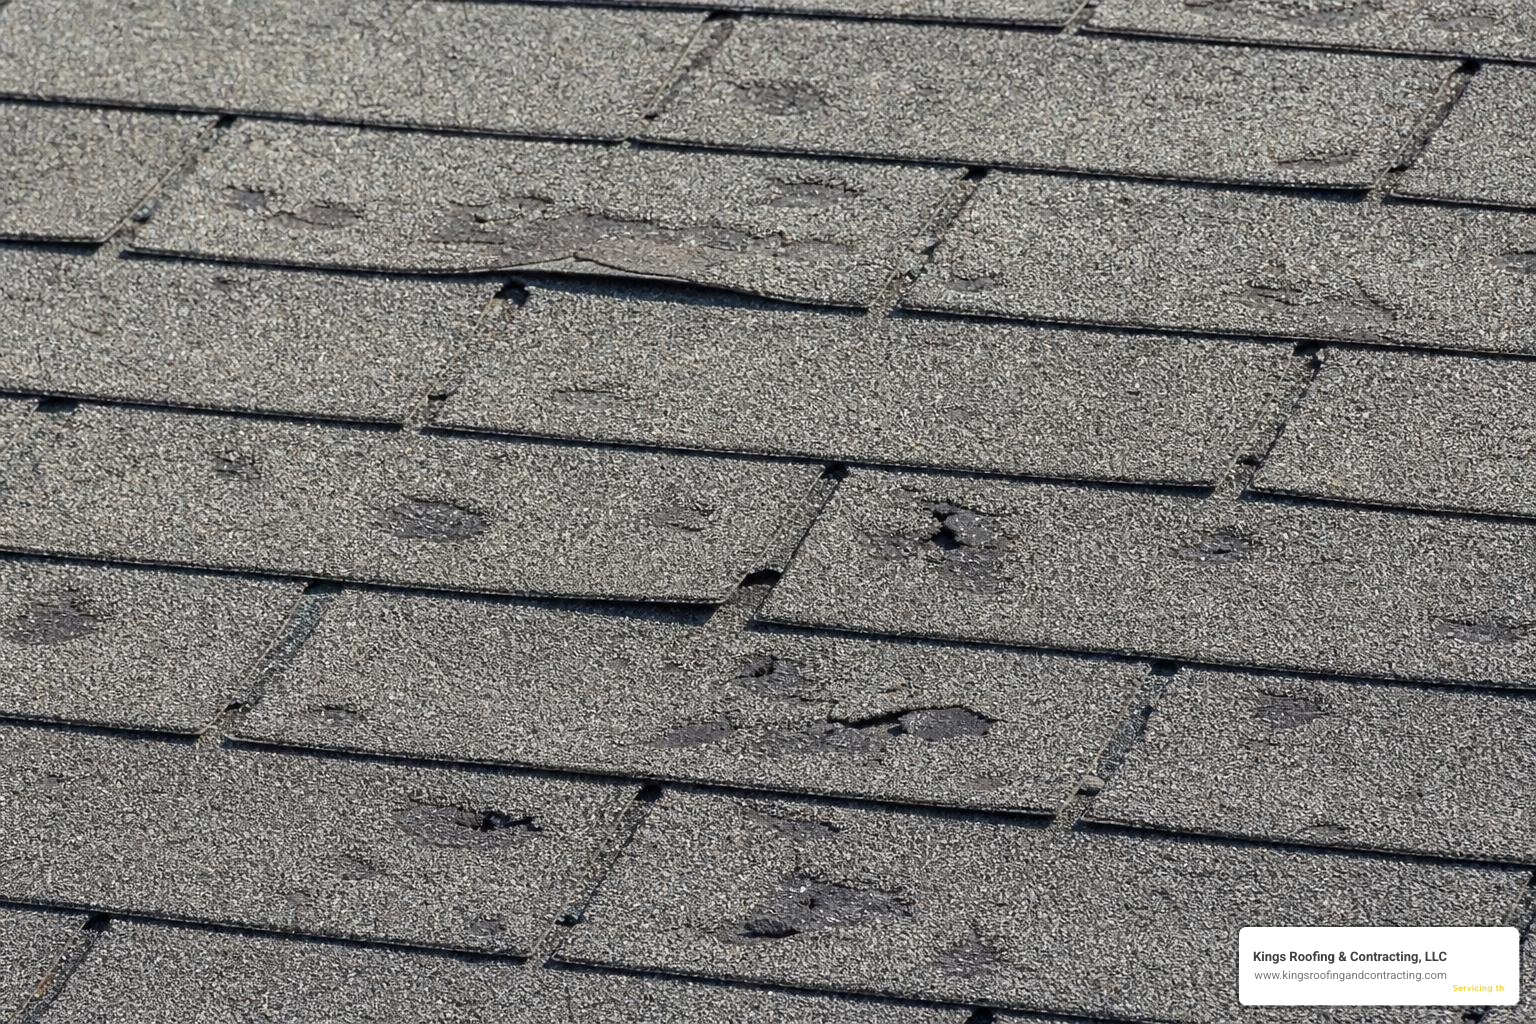
Identifying roof damage early is the single most effective way to prevent costly secondary issues like structural rot and mold. While some storm impacts are glaringly obvious, others are subtle and require a trained eye to spot.
When conducting a ground-level assessment after a storm, you should look for signs of both wind and hail damage. Wind primarily tears, lifts, or creases shingles, while hail leaves physical impact bruises. If you suspect your roof has been compromised, scheduling a professional hail damage roof repair or wind damage roof repair assessment is critical.
A complete post-storm inspection should cover:
- The Roof Surface: Missing, torn, curled, or bruised shingles.
- The Gutters: Heavy accumulation of mineral granules or dented gutter troughs.
- The Attic: Active water stains on rafters, wet insulation, or daylight peeking through the roof deck.
- The Trim and Flashing: Dented metal flashing around chimneys, vents, and valleys.
For homeowners navigating post-storm recovery, reviewing resources like the guide on Storm Damage Roof Repair in Treasure Valley, Idaho can provide localized context on weather patterns and regional repair standards.
Spotting Wind Damage and Missing Shingles
Wind damage occurs when high-velocity gusts create negative pressure over your roof. This aerodynamic phenomenon, known as the Bernoulli effect, literally sucks the shingles upward. If the wind exceeds the shingle’s wind rating, or if the factory seal strip has degraded, the shingle tabs will lift and crease.
Once a single shingle tab lifts, a cascading failure often occurs. The wind now has a direct pocket of entry to get underneath adjacent shingles, peeling them back and exposing the underlayment below. If your roof has suffered from this uplift, you will require prompt missing shingle replacement to seal the system back up.
Standard 3-tab shingles are typically rated to withstand winds only up to 60 mph (ASTM D3161 Class A). In contrast, high-quality architectural shingles are engineered to withstand winds up to 110 mph (Class F) or even 150 mph (Class H per ASTM D7158). However, real-world wind resistance drops dramatically if the shingles were poorly installed. For example, a single high nail placed above the designated nail line can reduce a shingle’s wind rating by up to 50%, making it highly vulnerable to blowing off during a moderate Treasure Valley storm.
Recognizing Hail Damage and Granule Loss
Hail damage on asphalt shingles is often latent, meaning the consequences do not show up as an immediate leak but manifest over the following months or years. When a hailstone strikes an asphalt shingle, it creates a physical “bruise.” This impact dislodges the protective mineral granules, exposing the underlying black asphalt coating or even the fiberglass mat.
If you find a large accumulation of colored granules in your gutters or at the discharge end of your downspouts after a storm, your roof has likely suffered severe granule loss. Without this protective granule layer, the exposed asphalt is subjected to rapid UV degradation from the sun. Within a few seasons, the sun’s rays will dry out, crack, and curl the shingle, leading to inevitable water intrusion.
According to the GAF Technical Bulletin on Storm Damage, cosmetic repairs like “sugaring” (applying loose granules over wet asphalt cement) are not permanent fixes. Shingles with ruptured asphalt coatings or exposed fiberglass mats must be physically replaced to maintain the roof’s weather-tight integrity.
Repair vs. Replacement: Evaluating the Extent of Damage
Deciding whether to perform a localized asphalt shingle storm repair or invest in a full roof replacement depends on the age of your roof, the extent of the storm damage, and local building codes.
| Evaluation Criteria | Localized Roof Repair | Full Roof Replacement |
|---|---|---|
| Damage Extent | Less than 25% of the roof surface is affected. | More than 25–30% of the roof surface is damaged. |
| Roof Age | Shingles are under 10–12 years old and pliable. | Shingles are over 15–20 years old and brittle. |
| Material Match | Matching manufacturer, profile, and color are available. | Original shingles are discontinued or severely faded. |
| Adhesion Quality | Surrounding seal strips are intact and strong. | Widespread seal strip failure across multiple planes. |
| Decking Condition | Underlayment and wood decking are dry and structurally sound. | Widespread moisture damage, rot, or soft spots in decking. |
A common industry standard is the 25–30% rule. If more than 25% to 30% of a roof plane or the entire roof structure is compromised, a localized roof repair is no longer cost-effective. At that point, a complete roof replacement is the safest and most logical choice.
Attempting to patch a heavily damaged roof often results in a “Frankenstein roof” effect. Because asphalt shingles fade naturally from UV exposure over time, installing brand-new shingles next to weathered ones creates highly visible, mismatched patches. Furthermore, older shingles become brittle with age; bending them upward to slide a new shingle underneath can crack the old tabs, creating new leaks in the process.
Immediate Steps to Take After a Storm

When a severe storm passes through Boise or the surrounding areas, taking immediate action can save you thousands of dollars in secondary damage. However, personal safety must always remain your absolute priority.
Ladder falls are a leading cause of home-maintenance injuries, causing over 500,000 injuries and roughly 300 deaths annually in the United States. Never walk on a wet, steep, or storm-damaged roof. Leave the climbing to licensed professionals and perform your initial inspections safely from ground level using binoculars or your smartphone camera.
If you discover active leaks inside your home, you must act quickly. Mold colonizes wet wood and drywall within a tight 24–48 hour window of sustained moisture exposure. Move your valuables out of the affected rooms, place buckets under active drips, and call for professional leak detection and emergency tarping.
An effective temporary tarp installation involves:
- Sizing the Tarp: Using a heavy-duty, outdoor-rated tarp that extends at least 4 feet past the damaged area and over the roof ridge to prevent water from running underneath.
- Securing the Tarp: Screwing the tarp down using 2×4 wooden strips rather than nailing or stapling it directly through your shingles. Nailing directly through shingles ruins them, requiring their eventual replacement.
- Documenting Before Tarping: Taking high-resolution, timestamped photos of the damage before the tarp is installed. Insurance adjusters need to see the raw damage to approve your claim.
Why Prompt Asphalt Shingle Storm Repair is Essential
Postponing an asphalt shingle storm repair is one of the most expensive mistakes a homeowner can make. Delaying repairs creates a compounding cost multiplier. What starts as a minor $150 to $500 shingle fix can easily escalate into an $8,000 to $20,000+ structural restoration within two years.
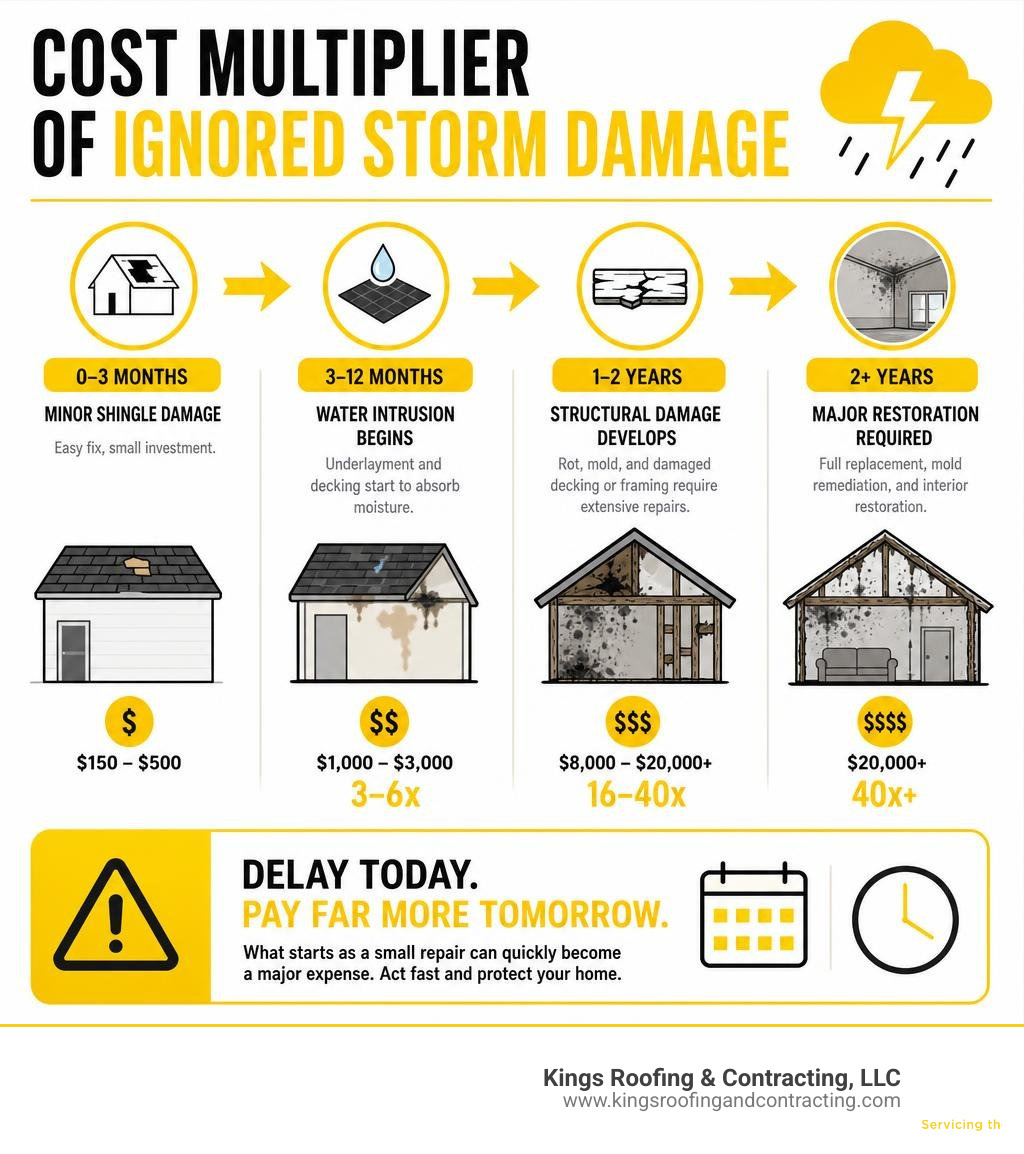
When water bypasses a missing or damaged shingle, it saturates the underlying wood decking. Over several freeze-thaw cycles, this moisture leads to wood rot, compromising the structural integrity of your roof. Fixing this deferred maintenance down the road requires tearing off the shingles, replacing the rotted plywood decking, sistering damaged structural rafters, and performing extensive interior mold remediation.
Additionally, a compromised roof system ruins your home’s energy efficiency. Wet insulation loses its R-value, forcing your HVAC system to work twice as hard to maintain comfortable indoor temperatures. If you have noticed sudden utility bill spikes following a major storm, hidden water intrusion may be the culprit, making a professional inspection from a storm damage roofing specialist highly necessary.
Step-by-Step Guide to Asphalt Shingle Storm Repair
While we strongly recommend hiring a professional for safety and warranty reasons, understanding the technical process of repairing storm-damaged asphalt shingle roofing helps you evaluate the quality of the work being done on your home.
Step 1: Perform a Comprehensive Inspection
The repair begins with a thorough inspection of the damaged area. We check the surrounding shingles to ensure their seal strips are still adhering properly. We also inspect the underlayment. While older felt underlayment degrades within days of direct sunlight exposure, modern synthetic underlayment can last for several weeks, though it still must be covered promptly to prevent leaks.
Step 2: Remove the Damaged Shingle
Using a flat pry bar, carefully slide the tool under the damaged shingle tab to break the sealant bond. Gently lift the shingle tab directly above the damaged one to locate the roofing nails. Slide the pry bar under the nail heads and apply upward pressure to pop them out. Repeat this process for all 4 to 6 nails securing the damaged shingle, and pull the broken shingle remnants free.
Step 3: Prepare and Install the Replacement
Cut a matching replacement shingle to the exact size of the vacant space. Slide the new shingle into position, ensuring it aligns perfectly with the shingles on either side. Nail the new shingle in place using corrosion-resistant roofing nails, placing them along the manufacturer’s designated nail line.
Step 4: Hand-Seal the Repair
Because the self-sealing adhesive strip on a new shingle requires solar heat to activate, we manually apply quarter-sized dabs of asphalt plastic cement under each shingle tab during cool weather repairs. This provides immediate wind resistance. Finally, we perform a controlled water test to verify that the repair is fully watertight.
DIY vs. Professional Asphalt Shingle Storm Repair
It can be tempting to attempt a DIY roof repair to save money, but the risks usually far outweigh the rewards. Climbing ladders and working on sloped roofs presents severe safety risks. Beyond physical danger, DIY repairs often void your manufacturer warranties. If a self-installed shingle blows off and causes interior water damage, your homeowner’s insurance policy may deny the claim due to improper installation.
Hiring a professional, GAF-certified installer ensures that your roof repair is completed using correct fastening patterns, matching materials, and code-compliant techniques. While professional repairs come with labor costs — and emergency surcharges of 25% to 50% can apply during active storm seasons — they protect your home’s long-term value and provide written warranties that keep your insurance coverage intact.
Navigating the Roof Insurance Claims Process
Filing a roof insurance claim after a storm can feel overwhelming, but a structured approach ensures you receive the payout you are entitled to. Wind and hail claims are the most common type of homeowners insurance claims, accounting for 49% of all property claims and averaging a payout of $13,511 per claim.
To navigate the process successfully, follow these steps:
- Review Your Policy: Determine if you have a Replacement Cost Value (RCV) policy, which covers the actual cost of replacing your roof, or an Actual Cash Value (ACV) policy, which depreciates the payout based on your roof’s age. Also, check if your deductible is a flat rate or a percentage of your home’s insured value (e.g., a 2% deductible on a $400,000 home means you pay $8,000 out of pocket).
- Cross-Reference Storm Dates: Verify the exact date of the storm using the NOAA Storm Events Database to provide your insurer with indisputable proof of the weather event.
- Document and File: Submit your timestamped photos and a detailed damage report to your insurance company as soon as possible.
- Schedule the Adjuster Meeting: Have your professional roofing contractor present during the adjuster’s physical inspection. Our team provides expert contractor advocacy, pointing out subtle damage like hail bruises and creased seal strips that adjusters sometimes overlook.
For seamless claim coordination and support, consider utilizing professional insurance claims assistance to guide you through the paperwork and adjuster meetings.
Extending the Lifespan of Your Asphalt Roof
An architectural asphalt shingle roof typically lasts 20 to 30 years nationally. However, roofs in Boise, Meridian, and the surrounding Treasure Valley experience a 15% to 20% shorter lifespan due to our severe temperature swings and intense freeze-thaw cycles.
Our local climate subjects roofs to 80 to 120 freeze-thaw cycles per year. This constant thermal expansion and contraction fatigues the seal strip adhesion and accelerates UV degradation. To extend your roof’s life, prioritize proactive roof maintenance.
Keep your gutters clean and clear of debris to prevent water from backing up under the eave shingles. Perform annual inspections, and clear away heavy pine needles or leaves that trap moisture on your shingles. For a complete look at protecting your roof in our local climate, read our comprehensive guide, No More Leaks: The Ultimate Guide to Asphalt Shingles in Boise. If you suspect old storm damage is catching up to your roof, reach out to our local Boise roof repair services for a professional maintenance check.
Upgrading to Impact-Resistant Shingles
If your roof has sustained significant storm damage and requires replacement, upgrading your materials is a smart way to future-proof your home. During your next roof installation, consider upgrading to UL 2218 Class 4 impact-resistant shingles.
Class 4 shingles are engineered with a rubberized SBS polymer blend that allows the shingle to absorb the impact of large hailstones without cracking or losing its protective granules. While these premium architectural and designer shingles cost more upfront, they often qualify you for substantial homeowner’s insurance premium discounts of 15% to 30% annually, making them an excellent long-term investment.
Frequently Asked Questions about Asphalt Shingle Storm Repair
How long do I have to file an insurance claim after storm damage?
Most insurance policies require you to notify them of storm damage promptly. While policy limits vary, there is typically a 1-to-2-year window from the exact date of the storm to file a claim. However, waiting to file is risky, as insurers may argue that the damage was caused by normal wear and tear rather than the specific storm event.
Can I just replace the missing shingles myself?
While it is physically possible, DIY shingle replacement is highly discouraged. Working on a roof presents severe safety hazards. Additionally, if you use mismatched colors or fail to nail and seal the new shingles correctly, the factory seal strip will fail, voiding your manufacturer warranty and potentially leading to future leaks.
How do freeze-thaw cycles affect storm-damaged shingles?
Boise’s climate brings 80 to 120 freeze-thaw cycles every year. When water from rain or melting snow gets under a cracked or lifted shingle, it freezes and expands. This expansion forces the shingle further upward, tearing the asphalt, fatiguing the seal strip, and accelerating the overall degradation of your roof.
Conclusion
Your roof is your home’s first line of defense against the elements. When a storm compromises your shingles, acting quickly is the only way to prevent minor damage from turning into a costly structural disaster.
At Kings Roofing & Contracting, LLC, we specialize in providing top-tier storm damage roofing services across Boise, Meridian, Nampa, Caldwell, Eagle, Garden City, and Kuna. As GAF-certified roofing professionals, we deliver exceptional workmanship, transparent pricing, and 24/7 emergency response to protect your home when you need us most.
Don’t let hidden storm damage compromise your home. Contact our team today to schedule your professional roof inspection and restore your roof’s defense.